
Ngôn ngữ: Tiếng Việt (file này), English, Indonesian, Urdu, Chinese, Brazilian Portuguese, Spanish, Russian, Polish, Korean, French.

![]()
![]()

![]()
![]()
![]()

- Về Getx
- Cài Đặt
- Counter App với GetX
- Tam Trụ
-
Utils
- Internationalization
- Translations
- Locales
- Change Theme
- GetConnect
- Default configuration
- Custom configuration
- GetPage Middleware
- Priority
- Redirect
- onPageCalled
- OnBindingsStart
- OnPageBuildStart
- OnPageBuilt
- OnPageDispose
- Other Advanced APIs
- Optional Global Settings and Manual configurations
- Local State Widgets
- Useful tips
- GetView
- GetResponsiveView
- GetWidget
- GetxService
- Breaking changes from 2.0
- Why Getx?
- Community
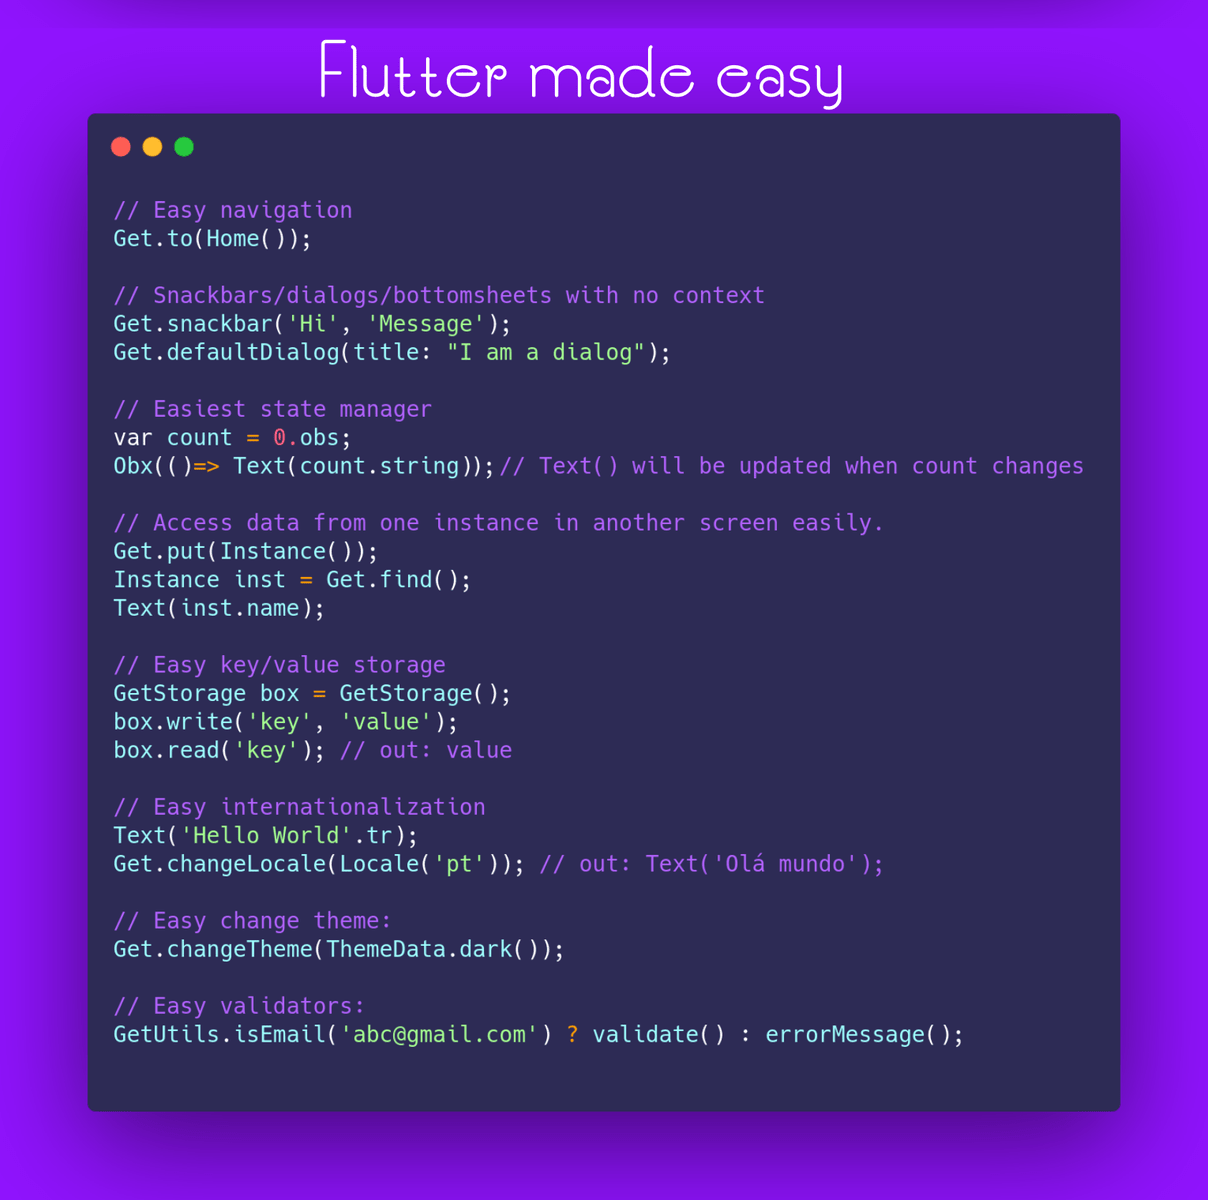
Về Getx
GetX hướng tới sự nhỏ gọn và giải pháp tối ưu cho Flutter với tốc độ ưu việt trong quản lý state, nạp dependency thông minh, và quản lý route nhanh chóng và thực tế.
-
GetX hướng tới 3 tham vọng chính, nghĩa là tất cả các tài nguyên của thư viện sẽ dành cho những điểm ưu tiên sau: NĂNG SUẤT, HIỆU SUẤT VÀ TỔ CHỨC.
- HIỆU SUẤT: GetX tập trung vào hiệu suất và mức tiêu thụ tài nguyên tối thiểu, do đó nó không sử dụng Streams hoặc ChangeNotifier.
- NĂNG SUẤT: GetX sử dụng một cú pháp dễ dàng và dễ thở. Bất kể bạn muốn làm gì, luôn có một cách dễ dàng hơn với GetX. Nó sẽ tiết kiệm hàng giờ phát triển và sẽ cung cấp hiệu suất tối đa mà ứng dụng của bạn có thể mang lại.
Nói chung, nhà phát triển nên quan tâm đến việc xóa controller ra khỏi memory. Với GetX, các tài nguyên sẽ TỰ ĐỘNG xóa khỏi memory khi không dùng theo mặc định. Nếu bạn muốn giữ nó trong memory, bạn phải khai báo rõ ràng "permanent: true" trong phần dependency của mình. Từ đó, bạn sẽ tiết kiệm thời gian và ít phụ thuộc vào memory. Theo mặc định, tính năng tải dependency cũng lười biếng.
-
TỔ CHỨC:
GetX cho phép tách toàn bộ Chế độ xem, presentation logic, business logic, nạp dependencies và điều hướng. Bạn không "context" để điều hướng giữa các route, vì vậy bạn sẽ độc lập trong sơ đồ widget (trực quan hóa). Bạn không cần "context" để truy cập Controller / Blocs của mình thông qua một InheritedWidget, vì vậy bạn hoàn toàn tách rời presentation logic và business logic khỏi lớp trực quan của mình. Bạn không cần phải đưa các Controller / Models / Blocs vào sơ đồ widget của mình thông qua
MultiProvider, vì GetX sử dụng tính năng nạp dependency của riêng nó, tách hoàn toàn DI khỏi chế độ xem của nó.
Với GetX, bạn biết nơi tìm từng tính năng ứng dụng của mình, với cơ chế clean code theo mặc định. Ngoài việc giúp bảo trì dễ dàng, GetX giúp việc chia sẻ các mô-đun trở thành khả thi trong Flutter. BLoC là điểm khởi đầu để tổ chức code trong Flutter, nó tách biệt logic nghiệp vụ với trực quan. GetX nảy sinh từ điều này, không chỉ tách biệt presentation logic mà còn cả business logic. Nạp dependency bổ sung và route cũng được tách ra và lớp dữ liệu cũng biến mất. Bạn sẽ biết mọi thứ ở đâu và sẽ hình dung tất cả những điều này dễ hơn cả "Hello World". GetX là cách dễ nhất, thiết thực và có thể mở rộng để xây dựng các ứng dụng hiệu suất cao với Flutter SDK. GetX chứa đựng một hệ sinh thái rộng lớn xung quanh nó hoạt động hoàn hảo cùng nhau, rất dễ dàng cho người mới bắt đầu và nó chính xác cho các chuyên gia. Nó an toàn, ổn định, cập nhật và cung cấp một loạt các API được tích hợp sẵn mà không có trong Flutter SDK mặc định.
GetX không cồng kềnh và có vô số tính năng cho phép bạn bắt đầu lập trình mà không cần lo lắng về bất cứ điều gì. Đặc biệt, nó cho phép mỗi tính năng này nằm trong các vùng chứa riêng biệt và chỉ được bắt đầu sau khi sử dụng. Nếu bạn chỉ sử dụng quản lý state thì sẽ chỉ có quản lý state được sử dụng. Nếu bạn chỉ sử dụng route, thì GetX không complie quản lý state.
GetX có một hệ sinh thái khổng lồ, một cộng đồng lớn, một số lượng lớn cộng tác viên và sẽ được duy trì miễn là Flutter còn tồn tại. GetX có khả năng chạy đồng dạng trên Android, iOS, Web, Mac, Linux, Windows và trên máy chủ của bạn. Bạn hoàn toàn có thể sử dụng lại mã của mình trên frontend qua backend với Get Server.
Ngoài ra, toàn bộ quá trình phát triển có thể hoàn toàn tự động, cả trên máy chủ và frontend với Get CLI.
Ngoài ra, nhằm tăng thêm năng suất của bạn, chúng tôi hỗ trợ extension to VSCode và extension to Android Studio/Intellij
Cài Đặt
Thêm Get vào pubspec.yaml file:
dependencies:
  get:
Import get vào file cần sử dụng:
import 'package:get/get.dart';Counter App with GetX
Dự án "counter" được tạo theo mặc định trên dự án mới trên Flutter có hơn 100 dòng (có comments). Để thể hiện sức mạnh của Get, tôi sẽ trình bày cách tạo "counter" thay đổi trạng thái với mỗi lần nhấp, chuyển đổi giữa các trang và chia sẻ trạng thái giữa các màn hình, tất cả đều theo cách có tổ chức, tách biệt logic nghiệp vụ khỏi chế độ xem, CHỈ VỚI 26 DÒNG!
- Step 1: Thêm "Get" trước MaterialApp, nó sẽ thành GetMaterialApp
void main() => runApp(GetMaterialApp(home: Home()));- Note: this does not modify the MaterialApp of the Flutter, GetMaterialApp is not a modified MaterialApp, it is just a pre-configured Widget, which has the default MaterialApp as a child. You can configure this manually, but it is definitely not necessary. GetMaterialApp will create routes, inject them, inject translations, inject everything you need for route navigation. If you use Get only for state management or dependency management, it is not necessary to use GetMaterialApp. GetMaterialApp is necessary for routes, snackbars, internationalization, bottomSheets, dialogs, and high-level apis related to routes and absence of context.
Note²: This step is only necessary if you gonna use route management (
Get.to(),Get.back()and so on). If you not gonna use it then it is not necessary to do step 1Step 2: Create your business logic class and place all variables, methods and controllers inside it. You can make any variable observable using a simple ".obs".
class Controller extends GetxController{
  var count = 0.obs;
  increment() => count++;
}- Step 3: Create your View, use StatelessWidget and save some RAM, with Get you may no longer need to use StatefulWidget.
class Home extends StatelessWidget {

  @override
  Widget build(context) {

    // Instantiate your class using Get.put() to make it available for all "child" routes there.
    final Controller c = Get.put(Controller());

    return Scaffold(
      // Use Obx(()=> to update Text() whenever count is changed.
      appBar: AppBar(title: Obx(() => Text("Clicks: ${c.count}"))),

      // Replace the 8 lines Navigator.push by a simple Get.to(). You don't need context
      body: Center(child: ElevatedButton(
              child: Text("Go to Other"), onPressed: () => Get.to(Other()))),
      floatingActionButton:
          FloatingActionButton(child: Icon(Icons.add), onPressed: c.increment));
  }
}

class Other extends StatelessWidget {
  // You can ask Get to find a Controller that is being used by another page and redirect you to it.
  final Controller c = Get.find();

  @override
  Widget build(context){
     // Access the updated count variable
     return Scaffold(body: Center(child: Text("${c.count}")));
  }
}
Result:

This is a simple project but it already makes clear how powerful Get is. As your project grows, this difference will become more significant.
Get was designed to work with teams, but it makes the job of an individual developer simple.
Improve your deadlines, deliver everything on time without losing performance. Get is not for everyone, but if you identified with that phrase, Get is for you!
Tam Trụ
Quản lý State
Get has two different state managers: the simple state manager (we'll call it GetBuilder) and the reactive state manager (GetX/Obx)
Reactive State Manager
Reactive programming can alienate many people because it is said to be complicated. GetX turns reactive programming into something quite simple:
- You won't need to create StreamControllers.
- You won't need to create a StreamBuilder for each variable
- You will not need to create a class for each state.
- You will not need to create a get for an initial value.
- You will not need to use code generators
Reactive programming with Get is as easy as using setState.
Let's imagine that you have a name variable and want that every time you change it, all widgets that use it are automatically changed.
This is your count variable:
var name = 'Jonatas Borges';To make it observable, you just need to add ".obs" to the end of it:
var name = 'Jonatas Borges'.obs;And in the UI, when you want to show that value and update the screen whenever the values changes, simply do this:
Obx(() => Text("${controller.name}"));That's all. It's that simple.
Thêm thông tin về Quản lý state
Xem thông tin cụ thể tại dây here. Tại đó, bạn có thể tham khảo ví dụ và so sánh sự khác nhau giữa quản lý state cơ bản và quản lý state reactive
Bạn sẽ hình dung sức mạnh của GetX.
Quản lý route
Nếu bạn chỉ sử dụng routes/snackbars/dialogs/bottomsheets không có context, GetX là lựa chọn số 2 trừ 1, nhìn đây:
Thêm "Get" trước MaterialApp, nó sẽ biến thành GetMaterialApp
GetMaterialApp( // Before: MaterialApp(
  home: MyHome(),
)
Di chuyển tới màn hình mới:
Get.to(NextScreen());Di chuyển tới màn hình mới theo tên. Xem thêm tại đây here
Get.toNamed('/details');Để đóng snackbars, dialogs, bottomsheets, hay bất kì thứ gì, bạn có thể xài cái này để thay Navigator.pop(context);
Get.back();Đi đến màn hình kế tiếp và bỏ luôn màn hình cũ (thường dùng cho màn hình giới thiệu, màn hình đăng nhập, etc.)
Get.off(NextScreen());Đi đến màn hình kế tiếp và đóng tất cả các routes (hữu dụng cho shopping cart, polls, và tests)
Get.offAll(NextScreen());Bạn có thấy nãy giờ chúng ta không sử dụng từ khóa "context"? Đây chính là thang điểm 9 + 1 của quản lý route ở Get. Với điểm mạnh trên, bạn có thể thao tác bất cứ đâu, kể cả trong controller class.
Thêm thông tin về quản lý route
Get works with named routes and also offers lower-level control over your routes! There is in-depth documentation here
Quản lý dependency
Get hỗ trợ tính năng giúp bạn lấy class như Bloc hoặc Controller chỉ với 1 dòng, khỏi cần Provider context hay InheritedWidget:
Controller controller = Get.put(Controller()); // Rather Controller controller = Controller();- Chí ú: Nếu bạn dùng cái này, nhớ đặt attention to thànhe bindings API, which will make it easier to connect your view to your controller.
Instead of instantiating your class within the class you are using, you are instantiating it within the Get instance, which will make it available throughout your App. So you can use your controller (or class Bloc) normally
Tip: Get dependency management is decoupled from other parts of the package, so if for example, your app is already using a state manager (any one, it doesn't matter), you don't need to rewrite it all, you can use this dependency injection with no problems at all
controller.fetchApi();Imagine that you have navigated through numerous routes, and you need data that was left behind in your controller, you would need a state manager combined with the Provider or Get_it, correct? Not with Get. You just need to ask Get to "find" for your controller, you don't need any additional dependencies:
Controller controller = Get.find();
//Yes, it looks like Magic, Get will find your controller, and will deliver it to you. You can have 1 million controllers instantiated, Get will always give you the right controller.
And then you will be able to recover your controller data that was obtained back there:
Text(controller.textFromApi);More details about dependency management
See a more in-depth explanation of dependency management here
Utils
Internationalization
Translations
Translations are kept as a simple key-value dictionary map.
To add custom translations, create a class and extend Translations.
import 'package:get/get.dart';

class Messages extends Translations {
  @override
  Map<String, Map<String, String>> get keys => {
        'en_US': {
          'hello': 'Hello World',
        },
        'de_DE': {
          'hello': 'Hallo Welt',
        }
      };
}
Using translations
Just append .tr to the specified key and it will be translated, using the current value of Get.locale and Get.fallbackLocale.
Text('title'.tr);Using translation with singular and plural
var products = [];
Text('singularKey'.trPlural('pluralKey', products.length, Args));
Using translation with parameters
import 'package:get/get.dart';


Map<String, Map<String, String>> get keys => {
    'en_US': {
        'logged_in': 'logged in as @name with email @email',
    },
    'es_ES': {
       'logged_in': 'iniciado sesión como @name con e-mail @email',
    }
};

Text('logged_in'.trParams({
  'name': 'Jhon',
  'email': 'jhon@example.com'
  }));
Locales
Pass parameters to GetMaterialApp to define the locale and translations.
return GetMaterialApp(
    translations: Messages(), // your translations
    locale: Locale('en', 'US'), // translations will be displayed in that locale
    fallbackLocale: Locale('en', 'UK'), // specify the fallback locale in case an invalid locale is selected.
);
Change locale
Call Get.updateLocale(locale) to update the locale. Translations then automatically use the new locale.
var locale = Locale('en', 'US');
Get.updateLocale(locale);
System locale
To read the system locale, you could use Get.deviceLocale.
return GetMaterialApp(
    locale: Get.deviceLocale,
);
Change Theme
Please do not use any higher level widget than GetMaterialApp in order to update it. This can trigger duplicate keys. A lot of people are used to the prehistoric approach of creating a "ThemeProvider" widget just to change the theme of your app, and this is definitely NOT necessary with GetX™.
You can create your custom theme and simply add it within Get.changeTheme without any boilerplate for that:
Get.changeTheme(ThemeData.light());If you want to create something like a button that changes the Theme in onTap, you can combine two GetX™ APIs for that:
- The api that checks if the dark
Themeis being used. - And the
ThemeChange API, you can just put this within anonPressed:
Get.changeTheme(Get.isDarkMode? ThemeData.light(): ThemeData.dark());When .darkmode is activated, it will switch to the light theme, and when the light theme becomes active, it will change to dark theme.
GetConnect
GetConnect is an easy way to communicate from your back to your front with http or websockets
Default configuration
You can simply extend GetConnect and use the GET/POST/PUT/DELETE/SOCKET methods to communicate with your Rest API or websockets.
class UserProvider extends GetConnect {
  // Get request
  Future<Response> getUser(int id) => get('http://youapi/users/$id');
  // Post request
  Future<Response> postUser(Map data) => post('http://youapi/users', body: data);
  // Post request with File
  Future<Response<CasesModel>> postCases(List<int> image) {
    final form = FormData({
      'file': MultipartFile(image, filename: 'avatar.png'),
      'otherFile': MultipartFile(image, filename: 'cover.png'),
    });
    return post('http://youapi/users/upload', form);
  }

  GetSocket userMessages() {
    return socket('https://yourapi/users/socket');
  }
}
Custom configuration
GetConnect is highly customizable You can define base Url, as answer modifiers, as Requests modifiers, define an authenticator, and even the number of attempts in which it will try to authenticate itself, in addition to giving the possibility to define a standard decoder that will transform all your requests into your Models without any additional configuration.
class HomeProvider extends GetConnect {
  @override
  void onInit() {
    // All request will pass to jsonEncode so CasesModel.fromJson()
    httpClient.defaultDecoder = CasesModel.fromJson;
    httpClient.baseUrl = 'https://api.covid19api.com';
    // baseUrl = 'https://api.covid19api.com'; // It define baseUrl to
    // Http and websockets if used with no [httpClient] instance

    // It's will attach 'apikey' property on header from all requests
    httpClient.addRequestModifier((request) {
      request.headers['apikey'] = '12345678';
      return request;
    });

    // Even if the server sends data from the country "Brazil",
    // it will never be displayed to users, because you remove
    // that data from the response, even before the response is delivered
    httpClient.addResponseModifier<CasesModel>((request, response) {
      CasesModel model = response.body;
      if (model.countries.contains('Brazil')) {
        model.countries.remove('Brazilll');
      }
    });

    httpClient.addAuthenticator((request) async {
      final response = await get("http://yourapi/token");
      final token = response.body['token'];
      // Set the header
      request.headers['Authorization'] = "$token";
      return request;
    });

    //Autenticator will be called 3 times if HttpStatus is
    //HttpStatus.unauthorized
    httpClient.maxAuthRetries = 3;
  }
  }

  @override
  Future<Response<CasesModel>> getCases(String path) => get(path);
}
GetPage Middleware
The GetPage has now new property that takes a list of GetMiddleWare and run them in the specific order.
Chí ú: Nếu bạn dùng cái này, nhớ đặten of thànhis page will have the same middlewares automatically.
Priority
The Order of the Middlewares to run can pe set by the priority in the GetMiddleware.
final middlewares = [
  GetMiddleware(priority: 2),
  GetMiddleware(priority: 5),
  GetMiddleware(priority: 4),
  GetMiddleware(priority: -8),
];
those middlewares will be run in this order -8 => 2 => 4 => 5
Redirect
This function will be called when the page of the called route is being searched for. It takes RouteSettings as a result to redirect to. Or give it null and there will be no redirecting.
RouteSettings redirect(String route) {
  final authService = Get.find<AuthService>();
  return authService.authed.value ? null : RouteSettings(name: '/login')
}
onPageCalled
This function will be called when this Page is called before anything created you can use it to change something about the page or give it new page
GetPage onPageCalled(GetPage page) {
  final authService = Get.find<AuthService>();
  return page.copyWith(title: 'Welcome ${authService.UserName}');
}
OnBindingsStart
This function will be called right before the Bindings are initialize. Here you can change Bindings for this page.
List<Bindings> onBindingsStart(List<Bindings> bindings) {
  final authService = Get.find<AuthService>();
  if (authService.isAdmin) {
    bindings.add(AdminBinding());
  }
  return bindings;
}
OnPageBuildStart
This function will be called right after the Bindings are initialize. Here you can do something after that you created the bindings and before creating the page widget.
GetPageBuilder onPageBuildStart(GetPageBuilder page) {
  print('bindings are ready');
  return page;
}
OnPageBuilt
This function will be called right after the GetPage.page function is called and will give you the result of the function. and take the widget that will be showed.
OnPageDispose
This function will be called right after disposing all the related objects (Controllers, views, ...) of the page.
Other Advanced APIs
// give the current args from currentScreen
Get.arguments

// give name of previous route
Get.previousRoute

// give the raw route to access for example, rawRoute.isFirst()
Get.rawRoute

// give access to Routing API from GetObserver
Get.routing

// check if snackbar is open
Get.isSnackbarOpen

// check if dialog is open
Get.isDialogOpen

// check if bottomsheet is open
Get.isBottomSheetOpen

// remove one route.
Get.removeRoute()

// back repeatedly until the predicate returns true.
Get.until()

// go to next route and remove all the previous routes until the predicate returns true.
Get.offUntil()

// go to next named route and remove all the previous routes until the predicate returns true.
Get.offNamedUntil()

//Check in what platform the app is running
GetPlatform.isAndroid
GetPlatform.isIOS
GetPlatform.isMacOS
GetPlatform.isWindows
GetPlatform.isLinux
GetPlatform.isFuchsia

//Check the device type
GetPlatform.isMobile
GetPlatform.isDesktop
//All platforms are supported independently in web!
//You can tell if you are running inside a browser
//on Windows, iOS, OSX, Android, etc.
GetPlatform.isWeb


// Equivalent to : MediaQuery.of(context).size.height,
// but immutable.
Get.height
Get.width

// Gives the current context of the Navigator.
Get.context

// Gives the context of the snackbar/dialog/bottomsheet in the foreground, anywhere in your code.
Get.contextOverlay

// Chí ú: Nếu bạn dùng cái này, nhớ đặtt. thànhnce you
// have access to context in any place of your UI, you can use it anywhere in the UI code

// If you need a changeable height/width (like Desktop or browser windows that can be scaled) you will need to use context.
context.width
context.height

// Gives you the power to define half the screen, a third of it and so on.
// Useful for responsive applications.
// param dividedBy (double) optional - default: 1
// param reducedBy (double) optional - default: 0
context.heightTransformer()
context.widthTransformer()

/// Similar to MediaQuery.of(context).size
context.mediaQuerySize()

/// Similar to MediaQuery.of(context).padding
context.mediaQueryPadding()

/// Similar to MediaQuery.of(context).viewPadding
context.mediaQueryViewPadding()

/// Similar to MediaQuery.of(context).viewInsets;
context.mediaQueryViewInsets()

/// Similar to MediaQuery.of(context).orientation;
context.orientation()

/// Check if device is on landscape mode
context.isLandscape()

/// Check if device is on portrait mode
context.isPortrait()

/// Similar to MediaQuery.of(context).devicePixelRatio;
context.devicePixelRatio()

/// Similar to MediaQuery.of(context).textScaleFactor;
context.textScaleFactor()

/// Get the shortestSide from screen
context.mediaQueryShortestSide()

/// True if width be larger than 800
context.showNavbar()

/// True if the shortestSide is smaller than 600p
context.isPhone()

/// True if the shortestSide is largest than 600p
context.isSmallTablet()

/// True if the shortestSide is largest than 720p
context.isLargeTablet()

/// True if the current device is Tablet
context.isTablet()

/// Returns a value<T> according to the screen size
/// can give value for:
/// watch: if the shortestSide is smaller than 300
/// mobile: if the shortestSide is smaller than 600
/// tablet: if the shortestSide is smaller than 1200
/// desktop: if width is largest than 1200
context.responsiveValue<T>()
Optional Global Settings and Manual configurations
GetMaterialApp configures everything for you, but if you want to configure Get manually.
MaterialApp(
  navigatorKey: Get.key,
  navigatorObservers: [GetObserver()],
);
You will also be able to use your own Middleware within GetObserver, this will not influence anything.
MaterialApp(
  navigatorKey: Get.key,
  navigatorObservers: [
    GetObserver(MiddleWare.observer) // Here
  ],
);
You can create Global Settings for Get. Just add Get.config to your code before pushing any route.
Or do it directly in your GetMaterialApp
GetMaterialApp(
  enableLog: true,
  defaultTransition: Transition.fade,
  opaqueRoute: Get.isOpaqueRouteDefault,
  popGesture: Get.isPopGestureEnable,
  transitionDuration: Get.defaultDurationTransition,
  defaultGlobalState: Get.defaultGlobalState,
);

Get.config(
  enableLog = true,
  defaultPopGesture = true,
  defaultTransition = Transitions.cupertino
)
You can optionally redirect all the logging messages from Get.
If you want to use your own, favourite logging package,
and want to capture the logs there:
GetMaterialApp(
  enableLog: true,
  logWriterCallback: localLogWriter,
);

void localLogWriter(String text, {bool isError = false}) {
  // pass the message to your favourite logging package here
  // please note that even if enableLog: false log messages will be pushed in this callback
  // you get check the flag if you want through GetConfig.isLogEnable
}
Local State Widgets
These Widgets allows you to manage a single value, and keep the state ephemeral and locally.
We have flavours for Reactive and Simple.
For instance, you might use them to toggle obscureText in a TextField, maybe create a custom
Expandable Panel, or maybe modify the current index in BottomNavigationBar while changing the content
of the body in a Scaffold.
ValueBuilder
A simplification of StatefulWidget that works with a .setState callback that takes the updated value.
ValueBuilder<bool>(
  initialValue: false,
  builder: (value, updateFn) => Switch(
    value: value,
    onChanged: updateFn, // same signature! you could use ( newValue ) => updateFn( newValue )
  ),
  // if you need to call something outside the builder method.
  onUpdate: (value) => print("Value updated: $value"),
  onDispose: () => print("Widget unmounted"),
),
ObxValue
Similar to ValueBuilder, but this is the Reactive version, you pass a Rx instance (remember the magical .obs?) and
updates automatically... isn't it awesome?
ObxValue((data) => Switch(
        value: data.value,
        onChanged: data, // Rx has a _callable_ function! You could use (flag) => data.value = flag,
    ),
    false.obs,
),
Useful tips
.observables (also known as Rx Types) have a wide variety of internal methods and operators.
Is very common to believe that a property with
.obsIS the actual value... but make no mistake! We avoid the Type declaration of the variable, because Dart's compiler is smart enough, and the code looks cleaner, but:
var message = 'Hello world'.obs;
print( 'Message "$message" has Type ${message.runtimeType}');
Even if message prints the actual String value, the Type is RxString!
So, you can't do message.substring( 0, 4 ).
You have to access the real value inside the observable:
The most "used way" is .value, but, did you know that you can also use...
final name = 'GetX'.obs;
// only "updates" the stream, if the value is different from the current one.
name.value = 'Hey';

// All Rx properties are "callable" and returns the new value.
// but this approach does not accepts `null`, the UI will not rebuild.
name('Hello');

// is like a getter, prints 'Hello'.
name() ;

/// numbers:

final count = 0.obs;

// You can use all non mutable operations from num primitives!
count + 1;

// Watch out! this is only valid if `count` is not final, but var
count += 1;

// You can also compare against values:
count > 2;

/// booleans:

final flag = false.obs;

// switches the value between true/false
flag.toggle();


/// all types:

// Sets the `value` to null.
flag.nil();

// All toString(), toJson() operations are passed down to the `value`
print( count ); // calls `toString()` inside  for RxInt

final abc = [0,1,2].obs;
// Converts the value to a json Array, prints RxList
// Json is supported by all Rx types!
print('json: ${jsonEncode(abc)}, type: ${abc.runtimeType}');

// RxMap, RxList and RxSet are special Rx types, that extends their native types.
// but you can work with a List as a regular list, although is reactive!
abc.add(12); // pushes 12 to the list, and UPDATES the stream.
abc[3]; // like Lists, reads the index 3.


// equality works with the Rx and the value, but hashCode is always taken from the value
final number = 12.obs;
print( number == 12 ); // prints > true

/// Custom Rx Models:

// toJson(), toString() are deferred to the child, so you can implement override on them, and print() the observable directly.

class User {
    String name, last;
    int age;
    User({this.name, this.last, this.age});

    @override
    String toString() => '$name $last, $age years old';
}

final user = User(name: 'John', last: 'Doe', age: 33).obs;

// `user` is "reactive", but the properties inside ARE NOT!
// So, if we change some variable inside of it...
user.value.name = 'Roi';
// The widget will not rebuild!,
// `Rx` don't have any clue when you change something inside user.
// So, for custom classes, we need to manually "notify" the change.
user.refresh();

// or we can use the `update()` method!
user.update((value){
  value.name='Roi';
});

print( user );
StateMixin
Another way to handle your UI state is use the StateMixin<T> .
To implement it, use the with to add the StateMixin<T>
to your controller which allows a T model.
class Controller extends GetController with StateMixin<User>{}The change() method change the State whenever we want.
Just pass the data and the status in this way:
change(data, status: RxStatus.success());RxStatus allow these status:
RxStatus.loading();
RxStatus.success();
RxStatus.empty();
RxStatus.error('message');
To represent it in the UI, use:
class OtherClass extends GetView<Controller> {
  @override
  Widget build(BuildContext context) {
    return Scaffold(

      body: controller.obx(
        (state)=>Text(state.name),

        // here you can put your custom loading indicator, but
        // by default would be Center(child:CircularProgressIndicator())
        onLoading: CustomLoadingIndicator(),
        onEmpty: Text('No data found'),

        // here also you can set your own error widget, but by
        // default will be an Center(child:Text(error))
        onError: (error)=>Text(error),
      ),
    );
}
GetView
I love this Widget, is so simple, yet, so useful!
Is a const Stateless Widget that has a getter controller for a registered Controller, that's all.
 class AwesomeController extends GetController {
   final String title = 'My Awesome View';
 }

  // ALWAYS remember to pass the `Type` you used to register your controller!
 class AwesomeView extends GetView<AwesomeController> {
   @override
   Widget build(BuildContext context) {
     return Container(
       padding: EdgeInsets.all(20),
       child: Text(controller.title), // just call `controller.something`
     );
   }
 }
GetResponsiveView
Extend this widget to build responsive view.
this widget contains the screen property that have all
information about the screen size and type.
Hướng dẫn sử dụng trước khi dùng
You have two options to build it.
- with
buildermethod you return the widget to build. - with methods
desktop,tablet,phone,watch. the specific method will be built when the screen type matches the method when the screen is [ScreenType.Tablet] thetabletmethod will be exuded and so on. Chí ú: Nếu bạn dùng cái này, nhớ đặtalwaysUseBuilderthànhfalse
Với settings property bạn có thể đặt chiều dài tối thiểu cho các loại màn hình.
 Code to this screen
code
Code to this screen
code
GetWidget
Most people have no idea about this Widget, or totally confuse the usage of it.
The use case is very rare, but very specific: It caches a Controller.
Because of the cache, can't be a const Stateless.
So, when do you need to "cache" a Controller?
If you use, another "not so common" feature of GetX: Get.create().
Get.create(()=>Controller()) will generate a new Controller each time you call
Get.find<Controller>(),
That's where GetWidget shines... as you can use it, for example,
to keep a list of Todo items. So, if the widget gets "rebuilt", it will keep the same controller instance.
GetxService
This class is like a GetxController, it shares the same lifecycle ( onInit(), onReady(), onClose()).
But has no "logic" inside of it. It just notifies GetX Dependency Injection system, that this subclass
can not be removed from memory.
So is super useful to keep your "Services" always reachable and active with Get.find(). Like:
ApiService, StorageService, CacheService.
Future<void> main() async {
  await initServices(); /// AWAIT SERVICES INITIALIZATION.
  runApp(SomeApp());
}

/// Is a smart move to make your Services intiialize before you run the Flutter app.
/// as you can control the execution flow (maybe you need to load some Theme configuration,
/// apiKey, language defined by the User... so load SettingService before running ApiService.
/// so GetMaterialApp() doesnt have to rebuild, and takes the values directly.
void initServices() async {
  print('starting services ...');
  /// Here is where you put get_storage, hive, shared_pref initialization.
  /// or moor connection, or whatever that's async.
  await Get.putAsync(() => DbService().init());
  await Get.putAsync(SettingsService()).init();
  print('All services started...');
}

class DbService extends GetxService {
  Future<DbService> init() async {
    print('$runtimeType delays 2 sec');
    await 2.delay();
    print('$runtimeType ready!');
    return this;
  }
}

class SettingsService extends GetxService {
  void init() async {
    print('$runtimeType delays 1 sec');
    await 1.delay();
    print('$runtimeType ready!');
  }
}
The only way to actually delete a GetxService, is with Get.reset() which is like a
"Hot Reboot" of your app. So remember, if you need absolute persistence of a class instance during the
lifetime of your app, use GetxService.
Breaking changes from 2.0
1- Rx types:
| Before | After |
|---|---|
| StringX | RxString |
| IntX | RxInt |
| MapX | RxMap |
| ListX | RxList |
| NumX | RxNum |
| DoubleX | RxDouble |
RxController and GetBuilder now have merged, you no longer need to memorize which controller you want to use, just use GetxController, it will work for simple state management and for reactive as well.
2- NamedRoutes Before:
GetMaterialApp(
  namedRoutes: {
    '/': GetRoute(page: Home()),
  }
)
Now:
GetMaterialApp(
  getPages: [
    GetPage(name: '/', page: () => Home()),
  ]
)
Why this change? Often, it may be necessary to decide which page will be displayed from a parameter, or a login token, the previous approach was inflexible, as it did not allow this. Inserting the page into a function has significantly reduced the RAM consumption, since the routes will not be allocated in memory since the app was started, and it also allowed to do this type of approach:
GetStorage box = GetStorage();

GetMaterialApp(
  getPages: [
    GetPage(name: '/', page:(){
      return box.hasData('token') ? Home() : Login();
    })
  ]
)
Why Getx?
1- Many times after a Flutter update, many of your packages will break. Sometimes compilation errors happen, errors often appear that there are still no answers about, and the developer needs to know where the error came from, track the error, only then try to open an issue in the corresponding repository, and see its problem solved. Get centralizes the main resources for development (State, dependency and route management), allowing you to add a single package to your pubspec, and start working. After a Flutter update, the only thing you need to do is update the Get dependency, and get to work. Get also resolves compatibility issues. How many times a version of a package is not compatible with the version of another, because one uses a dependency in one version, and the other in another version? This is also not a concern using Get, as everything is in the same package and is fully compatible.
2- Flutter is easy, Flutter is incredible, but Flutter still has some boilerplate that may be unwanted for most developers, such as Navigator.of(context).push (context, builder [...]. Get simplifies development. Instead of writing 8 lines of code to just call a route, you can just do it: Get.to(Home()) and you're done, you'll go to the next page. Dynamic web urls are a really painful thing to do with Flutter currently, and that with GetX is stupidly simple. Managing states in Flutter, and managing dependencies is also something that generates a lot of discussion, as there are hundreds of patterns in the pub. But there is nothing as easy as adding a ".obs" at the end of your variable, and place your widget inside an Obx, and that's it, all updates to that variable will be automatically updated on the screen.
3- Ease without worrying about performance. Flutter's performance is already amazing, but imagine that you use a state manager, and a locator to distribute your blocs/stores/controllers/ etc. classes. You will have to manually call the exclusion of that dependency when you don't need it. But have you ever thought of simply using your controller, and when it was no longer being used by anyone, it would simply be deleted from memory? That's what GetX does. With SmartManagement, everything that is not being used is deleted from memory, and you shouldn't have to worry about anything but programming. You will be assured that you are consuming the minimum necessary resources, without even having created a logic for this.
4- Actual decoupling. You may have heard the concept "separate the view from the business logic". This is not a peculiarity of BLoC, MVC, MVVM, and any other standard on the market has this concept. However, this concept can often be mitigated in Flutter due to the use of context. If you need context to find an InheritedWidget, you need it in the view, or pass the context by parameter. I particularly find this solution very ugly, and to work in teams we will always have a dependence on View's business logic. Getx is unorthodox with the standard approach, and while it does not completely ban the use of StatefulWidgets, InitState, etc., it always has a similar approach that can be cleaner. Controllers have life cycles, and when you need to make an APIREST request for example, you don't depend on anything in the view. You can use onInit to initiate the http call, and when the data arrives, the variables will be populated. As GetX is fully reactive (really, and works under streams), once the items are filled, all widgets that use that variable will be automatically updated in the view. This allows people with UI expertise to work only with widgets, and not have to send anything to business logic other than user events (like clicking a button), while people working with business logic will be free to create and test the business logic separately.
This library will always be updated and implementing new features. Feel free to offer PRs and contribute to them.
Community
Community channels
GetX has a highly active and helpful community. If you have questions, or would like any assistance regarding the use of this framework, please join our community channels, your question will be answered more quickly, and it will be the most suitable place. This repository is exclusive for opening issues, and requesting resources, but feel free to be part of GetX Community.
| Slack | Discord | Telegram |
|---|---|---|
|
How to contribute
Want to contribute to the project? We will be proud to highlight you as one of our collaborators. Here are some points where you can contribute and make Get (and Flutter) even better.
- Helping to translate the readme into other languages.
- Adding documentation to the readme (a lot of Get's functions haven't been documented yet).
- Write articles or make videos teaching how to use Get (they will be inserted in the Readme and in the future in our Wiki).
- Offering PRs for code/tests.
- Including new functions.
Any contribution is welcome!
Articles and videos
- Flutter Getx EcoSystem package for arabic people - Tutorial by Pesa Coder.
- Dynamic Themes in 3 lines using GetX™ - Tutorial by Rod Brown.
- Complete GetX™ Navigation - Route management video by Amateur Coder.
- Complete GetX State Management - Quản lý State video by Amateur Coder.
- GetX™ Other Features - Utils, storage, bindings and other features video by Amateur Coder.
- Firestore User with GetX | Todo App - Video by Amateur Coder.
- Firebase Auth with GetX | Todo App - Video by Amateur Coder.
- The Flutter GetX™ Ecosystem ~ State Management - Quản lý State by Aachman Garg.
- The Flutter GetX™ Ecosystem ~ Dependency Injection - Dependency Injection by Aachman Garg.
- GetX, the all-in-one Flutter package - A brief tutorial covering State Management and Navigation by Thad Carnevalli.
- Build a To-do List App from scratch using Flutter and GetX - UI + State Management + Storage video by Thad Carnevalli.
- GetX Flutter Firebase Auth Example - Article by Jeff McMorris.
- Flutter State Management with GetX – Complete App - by App With Flutter.
- Flutter Routing with Animation using Get Package - by App With Flutter.
- A minimal example on dartpad - by Roi Peker