

![]()
![]()

![]()
![]()
![]()

- Getとは
- インストール方法
- GetXによるカウンターアプリ
- 三本柱
-
Utils
- Internationalization
- Translations
- Locales
- Change Theme
- GetConnect
- Default configuration
- Custom configuration
- GetPage Middleware
- Priority
- Redirect
- onPageCalled
- OnBindingsStart
- OnPageBuildStart
- OnPageBuilt
- OnPageDispose
- Other Advanced APIs
- Optional Global Settings and Manual configurations
- Local State Widgets
- Useful tips
- GetView
- GetResponsiveView
- GetWidget
- GetxService
- Breaking changes from 2.0
- なぜGetXなのか
- コミュニティ
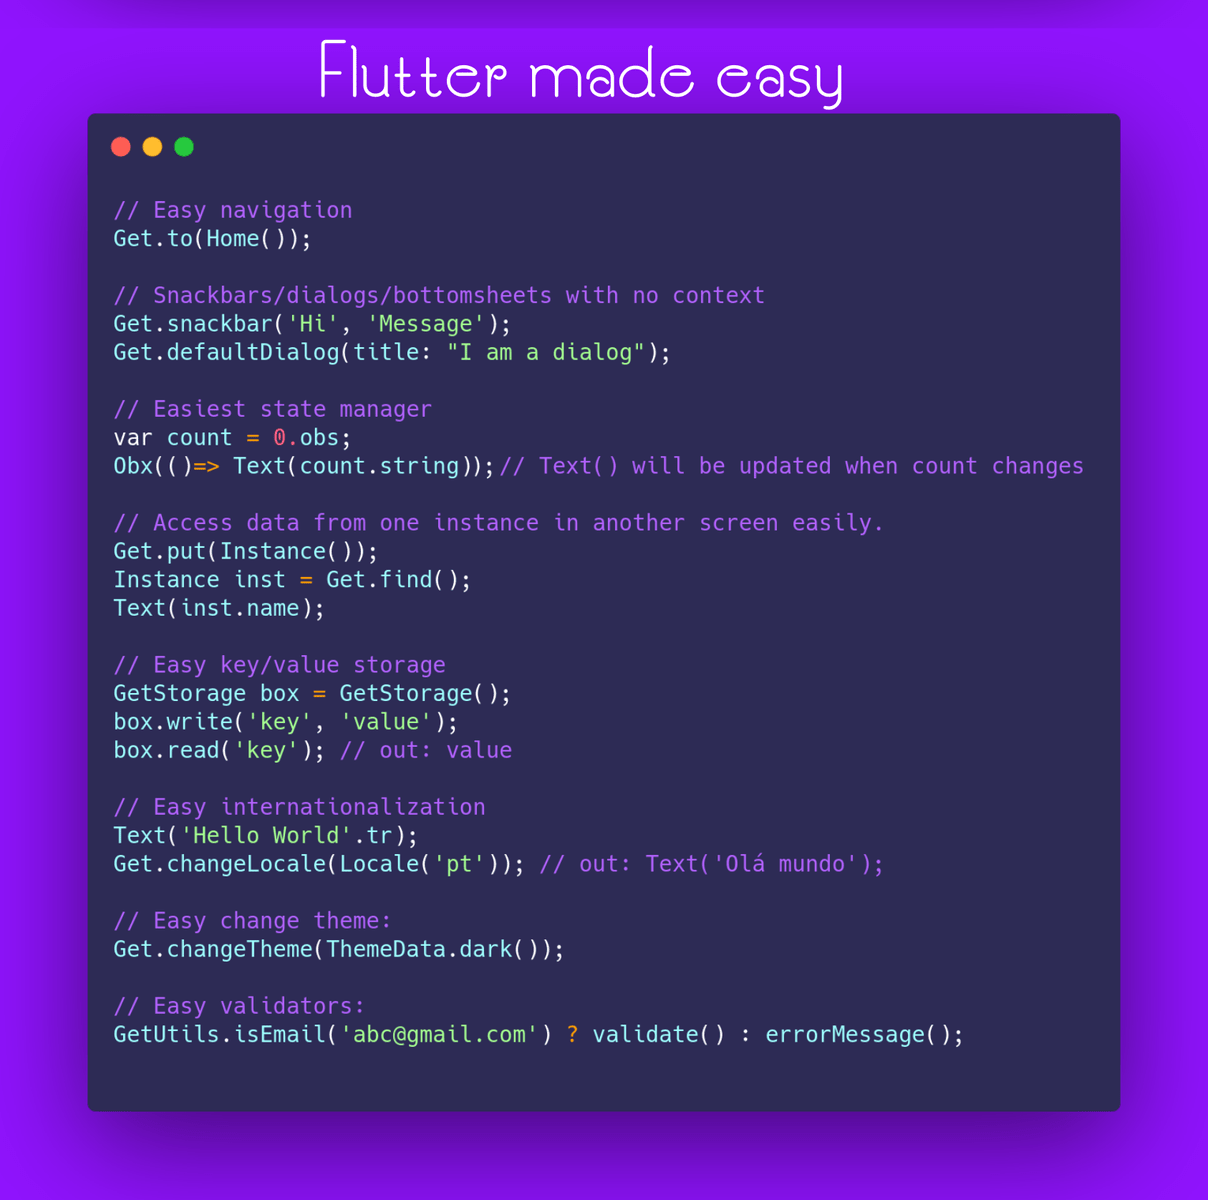
Getとは
GetXはFlutterのための超軽量でパワフルなソリューションです。高パフォーマンスな状態管理、インテリジェントな依存性注入、そしてRoute管理の三本柱を迅速かつ実用的な形で組み合わせています。
-
GetXは3つの基本原則を元に開発されています。 【生産性、パフォーマンス、コードの分離性】 これらはライブラリ内のすべてのリソースに優先適用される項目です。
- パフォーマンス: GetXは高いパフォーマンスと最小限のリソース消費を優先しています。GetXはStreamや ChangeNotifierを使用しません。
- 生産性: GetXはシンプルで使い心地のいい構文を採用しています。あなたの実現したい機能がどんなものであれ、GetXを使えばより簡単に実現できる方法が見つかるでしょう。開発にかかる時間を短縮し、あなたのアプリケーションのパフォーマンスを最大限引き出してくれます。
開発者はcontrollerなどのリソースをメモリから削除することに気を配るのが常です。しかしGetXでは、リソースが使用されていないときはメモリから削除されるのがデフォルト動作のため、この必要はありません。(逆にメモリに残しておきたい場合は、依存オブジェクトのパラメーターで「permanent: true」と明示的に宣言します)これにより時間が節約できますし、不要な依存オブジェクトがメモリ上に残るリスクも少なくなります。メモリへの読み込みについてもデフォルトは遅延読み込みであり、使用するときに初めてメモリ上に読み込まれます。
-
コードの分離性: GetXでは、View、プレゼンテーションロジック、ビジネスロジック、依存性注入、およびナビゲーション周りのコードを徹底して分離することができます。Route間のナビゲーションではcontextを必要としないため、Widgetツリーに依存することはありません。ロジックについてもInheritedWidget経由でcontroller/BLoCにアクセスするためのcontextは必要ありません。これによりプレゼンテーションロジックとビジネスロジックをUIレイヤーから完全に切り離すことができます。また、controller/model/BLoCのクラスを、
MultiProviderを使ってWidgetツリーに注入する必要もありません。GetXでは独自の依存性注入機能を使用して、依存性注入とViewに関わるコードを完全に分離することができます。
GetXを使うことでアプリケーションの各機能がどこに記載されているのかがわかりやすくなり、自然と見やすいコードになります。メンテナンスが容易になるだけでなく、それまでのFlutterでは考えられなかったモジュール共有が簡単に実現できるようになりました。 BLoCはその分野におけるFlutterの出発点でしたが、GetXはこれを正統進化させたもので、ビジネスロジックのみならずプレゼンテーションロジックも分離することができます。そのほか依存オブジェクトやRouteの注入も分離し、データレイヤーはこれらすべてから切り離されます。どこに何が配置されているのか構造がわかりやすくなり、Hello Worldを表示するよりも簡単に機能を利用できるようになるでしょう。 GetXはFlutter製の高性能アプリを作るために採用できる最も簡単で実用的、かつスケーラブルなソリューションです。強力なエコシステムも存在し、初心者にはわかりやすさ、プロフェッショナルには正確性を約束します。セキュアで安定的、かつFlutter/Dartの最新事情をいち早く反映し、Flutter SDKにはない幅広い種類のAPIを提供します。
GetXは肥大化したライブラリではありません。何も気にせずすぐにプログラミングを始められるよう多数の機能を標準で備えていますが、それぞれの機能は個別にコンテナに入っており、使用してはじめて起動します。状態管理機能しか利用していない場合はその機能だけがコンパイルされます。Route管理機能だけを利用している場合は、状態管理機能は何もコンパイルされません。
GetXには大きなエコシステム、コミュニティ、コラボレーターの存在があるため、Flutterが存在する限りメンテナンスされ続けます。GetXもFlutterと同様にAndroid、iOS、Web、Mac、Linux、Windows、そしてあなたのサーバー上で、一つのコードから実行することができます。
Get Serverを使うことで、フロントエンドで作成したコードをバックエンドで再利用することが可能です。
さらに、Get CLIを使えば、サーバー側でもフロントエンド側でも開発プロセス全体を自動化することができます。
また、生産性をさらに高めるためのツールとして、VSCode用の拡張機能 と Android Studio/Intellij用の拡張機能があります。
インストール方法
Getパッケージを pubspec.yaml に追加します:
dependencies:
  get:
使用するときはこのようにインポートしてください:
import 'package:get/get.dart';GetXによるカウンターアプリ
Flutterで新規プロジェクトを作成する際に表示されるカウンターアプリは、コメントを含めると100行以上あります。Getの実力を示すため、このカウンターアプリを可読性を重視した形で、コメントを含めてわずか26行のコードで作成する方法を紹介します。
- ステップ1: MaterialAppの前に「Get」を足して、GetMaterialAppにします。
void main() => runApp(GetMaterialApp(home: Home()));- 注1: GetMaterialAppはFlutterのMaterialAppに手を加えたものではありません。MaterialAppをchildに持ち、諸々の追加設定をしてくれるWidgetに過ぎません。この設定は手動でも可能ですが、その必要はありません。GetMaterialAppは、Routeの作成・注入、言語翻訳の注入など、ナビゲーションに必要なものをすべて注入してくれます。Getを状態管理や依存性注入に限定して使用する場合は、GetMaterialAppを使用する必要はありません。GetMaterialAppは、Route、SnackBar、多言語対応、BottomSheet、Dialog、contextなしの高レベルAPIを利用する場合に必要です。
注2: このステップは、Route管理機能(
Get.to()やGet.back()など)を使用しない場合は、必要ありません。ステップ2: ビジネスロジッククラスを作成し、そこに必要な変数、メソッド、コントローラをすべて配置します。 変数に ".obs" を付け足すことで、その変数の値の変化を監視することが可能になります。
class Controller extends GetxController{
  var count = 0.obs;
  increment() => count++;
}- ステップ3: Viewを作成します。StatelessWidgetを使用することでRAMが節約できます。GetではStatefulWidgetを使用する必要がなくなるかもしれません。
class Home extends StatelessWidget {

  @override
  Widget build(context) {

    // Get.put()を使ってクラスをインスタンス化することですべての「子」Routeで利用ができます。
    final Controller c = Get.put(Controller());

    return Scaffold(
      // countが変わるたびにTextを更新するにはObx(()=>)を使ってください。
      appBar: AppBar(title: Obx(() => Text("Clicks: ${c.count}"))),

      // 8行使っていたNavigator.pushの代わりに短い Get.to()を使ってください。context不要です。
      body: Center(child: ElevatedButton(
              child: Text("Go to Other"), onPressed: () => Get.to(Other()))),
      floatingActionButton:
          FloatingActionButton(child: Icon(Icons.add), onPressed: c.increment));
  }
}

class Other extends StatelessWidget {
  // 他のページで使われているコントローラーを見つけてきてくれます。
  final Controller c = Get.find();

  @override
  Widget build(context){
     // 最新のcount変数の値にアクセス
     return Scaffold(body: Center(child: Text("${c.count}")));
  }
}
Result:

これはシンプルな例ですが、すでにGetがいかに強力であるかがわかると思います。プロジェクトが大きければ大きいほど、この差はもっと開くでしょう。
Getはチームでの作業を想定して設計されていますが、個人開発者の仕事もシンプルにしてくれます。
パフォーマンスを落とさず納期までにすべて納品。Getはすべての人に向いているわけではありませんが、このフレーズにぴんと来た人には確実に向いています!
三本柱
状態管理
Getには、シンプルな手法(GetBuilder)と、リアクティブな手法(GetX/Obx)の2種類の状態管理手法があります。
リアクティブな状態管理
リアクティブプログラミングは複雑であると言われ、多くの人に敬遠されています。GetXは、リアクティブプログラミングをシンプルなものに変えます:
- StreamControllerを作る必要がありません。
- 変数の数だけStreamBuilderを準備する必要がありません。
- 状態ごとにクラスを作成する必要がありません。
- 最初の値に対してgetを作成する必要がありません。
- コードの自動生成をする必要がありません。
GetにおけるリアクティブプログラミングはsetStateと同じように簡単です。
例えば、名前の変数があって、それを変更するたびに、その名前を使っているすべてのWidgetを自動で更新したい場合。
var name = 'Jonatas Borges';このnameを監視可能にするには, ".obs"を値の末尾に付けるだけです。
var name = 'Jonatas Borges'.obs;UIでその値を表示し、値が変わるたびに内容を更新したい場合は次のようにします。
Obx(() => Text("${controller.name}"));以上です。こんなに簡単なんですよ。
状態管理についての詳細
状態管理のより詳細な説明を知りたい方はこちらをご覧ください。より多くの例や、普通の状態管理とリアクティブな状態管理の違いについても説明されています。
GetXパワーがもたらす利点をより理解していただけると思います。
Route管理
GetXはcontextなしでRoute/SnackBar/Dialog/BottomSheetを使用することができます。具体的に見ていきましょう。
いつものMaterialAppの前に「Get」を付け足して、GetMaterialAppにしましょう。
GetMaterialApp( // MaterialApp の前に Get
  home: MyHome(),
)
新しいRouteに画面遷移するにはこの構文。
Get.to(NextScreen());名前付きRouteに画面遷移するにはこの構文。名前付きRouteの詳細はこちら
Get.toNamed('/details');SnackBar、Dialog、BottomSheetなど、Navigator.pop(context)で閉じられるRouteはこれで閉じます。
Get.back();次の画面に移動した後、前の画面に戻れないようにする場合(スプラッシュスクリーンやログイン画面など)はこちら。
Get.off(NextScreen());次の画面に進み、前のRouteをすべてキャンセルする場合(ショッピングカート、アンケート、テストなど)はこちら。
Get.offAll(NextScreen());以上、contextを一度も使わなかったことに気付きましたか?これがGetでRoute管理を行う最大のメリットのひとつです。contextを使わないので、たとえばcontrollerクラスの中でも、これらのメソッドを実行することができます。
Route管理についての詳細
Getは名前付きRouteでも動作し、Routeの下位レベルの制御も可能です。詳細なドキュメントはこちらにあります。
依存性注入の管理
Getにはシンプルで強力な依存性注入機能があります。わずか1行のコードで、Provider contextやinheritedWidgetも使わず、BLoCやControllerのようなクラスのインスタンスを取得することができます。
Controller controller = Get.put(Controller()); // controller = Controller() とする代わりに- 注: Getの状態管理機能を使用している場合は、Bindings APIにもご注目を。BindingsはViewとControllerを結びつけるのをより便利にしてくれます。
一つのクラスの中でControllerクラスをインスタンス化するのではなく、Getインスタンスの中でインスタンス化することで、アプリ全体でControllerが利用できるようになります。
ヒント: Getの依存性注入機能の部分は、パッケージ全体の中でも他の部分と切り離されているので、たとえば、あなたのアプリがすでに状態管理機能を一部で使用していたとしても、それらを書き直す必要はなく、この依存性注入機能をそのまま使用することができます。
controller.fetchApi();色々なRouteを行き来した後に、あるControllerクラスのデータにアクセスする必要が生じたとしましょう。ProviderやGet_itなら再びそのクラスに依存性注入する必要がありますよね?Getの場合は違います。Getでは「find」と依頼するだけで、追加の依存性注入は必要ありません。
Controller controller = Get.find();
//マジックみたいですね。Getは正しいcontrollerをきちんと探してきてくれますよ。100万のcontrollerのインスタンスがあっても、Getは必ず正しいcontrollerを探し当てます。
そして、findで取得したコントローラーのデータをこのように呼び出すことができます。
Text(controller.textFromApi);依存性注入の管理についての詳細
依存性注入管理のより詳細な説明はこちらをご覧ください。
ユーティリティ
多言語対応
翻訳
翻訳ファイルはシンプルなキーと値のMapとして保持されます。
翻訳を追加するには、クラスを作成して Translations を継承します。
import 'package:get/get.dart';

class Messages extends Translations {
  @override
  Map<String, Map<String, String>> get keys => {
        'en_US': {
          'hello': 'Hello World',
        },
        'de_DE': {
          'hello': 'Hallo Welt',
        }
      };
}
翻訳の利用
指定されたキーに .tr (translateのtr)を追加するだけで、Get.locale と Get.fallbackLocale の現在の値をに沿って適切な言語に翻訳されます。
Text('title'.tr);単数系と複数形に対応
var products = [];
Text('singularKey'.trPlural('pluralKey', products.length, Args));
パラメーターに対応
import 'package:get/get.dart';


Map<String, Map<String, String>> get keys => {
    'en_US': {
        'logged_in': 'logged in as @name with email @email',
    },
    'es_ES': {
       'logged_in': 'iniciado sesión como @name con e-mail @email',
    }
};

Text('logged_in'.trParams({
  'name': 'Jhon',
  'email': 'jhon@example.com'
  }));
ロケール
ロケールと翻訳を定義するため、GetMaterialAppにパラメータを渡します。
return GetMaterialApp(
    translations: Messages(), // Translationsを継承したクラスのインスタンス
    locale: Locale('en', 'US'), // このロケール設定に沿って翻訳が表示される
    fallbackLocale: Locale('en', 'UK'), // 無効なロケールだったときのフォールバックを指定
);
ロケールの変更
ロケールを変更するには、Get.updateLocale(locale)を呼び出します。翻訳は新しいロケールに沿ってなされます。
var locale = Locale('en', 'US');
Get.updateLocale(locale);
システムロケール
システムのロケールを読み込むには、Get.deviceLocaleを使用します。
return GetMaterialApp(
    locale: Get.deviceLocale,
);
Themeの変更
GetMaterialAppより上位のWidgetを使ってThemeを変更しないでください。Keyの重複を引き起こす可能性があります。アプリのThemeを変更するためには「ThemeProvider」Widgetを作成するという前時代的なアプローチが採られることが多いですが、GetX™ではこのようなことは必要ありません。
カスタムのThemeDataを作成したら、それをGet.changeTheme内に追加するだけです。
Get.changeTheme(ThemeData.light());もし、onTapでThemeを変更するボタンを作りたいのであれば、以下の2つのGetX™ APIを組み合わせることができます。
- Dark Theme が使われているかどうかをチェックするAPI
- Theme を変えるAPI(ボタンの
onPressedの中に設置できます)
Get.changeTheme(Get.isDarkMode? ThemeData.light(): ThemeData.dark());Darkモードが有効であれば、light themeに切り替わり、Lightモードが有効なら、dark themeに切り替わります。
GetConnect
GetConnect は、http または websocket を使用してバックエンドとフロントエンド間の通信を行う機能です。
デフォルト設定
GetConnectを拡張することで、GET/POST/PUT/DELETE/SOCKETメソッドを使用して、Rest APIやウェブソケットと通信することができます。
class UserProvider extends GetConnect {
  // Get リクエスト
  Future<Response> getUser(int id) => get('http://youapi/users/$id');
  // Post リクエスト
  Future<Response> postUser(Map data) => post('http://youapi/users', body: data);
  // File付き Post リクエスト
  Future<Response<CasesModel>> postCases(List<int> image) {
    final form = FormData({
      'file': MultipartFile(image, filename: 'avatar.png'),
      'otherFile': MultipartFile(image, filename: 'cover.png'),
    });
    return post('http://youapi/users/upload', form);
  }

  GetSocket userMessages() {
    return socket('https://yourapi/users/socket');
  }
}
カスタム設定
GetConnect は高度なカスタマイズが可能です。ベースUrlの定義はもちろん、リクエストヘッダーを足したり、レスポンスボディに変更を加えたり、認証情報を追加したり、認証回数の制限を設けたりすることができるほか、リクエストをModelに変換するデコーダを定義することもできます。
class HomeProvider extends GetConnect {
  @override
  void onInit() {
    // デフォルトデコーダーをセット
    httpClient.defaultDecoder = CasesModel.fromJson;
    httpClient.baseUrl = 'https://api.covid19api.com';
    // baseUrlをセット

    // リクエストヘッダーに 'apikey' プロパティを付け足しています。
    httpClient.addRequestModifier((request) {
      request.headers['apikey'] = '12345678';
      return request;
    });

    // サーバーが"Brazil"を含むデータを送ってきてもユーザーに表示されることはありません。
    // レスポンスがUIレイヤーに届けられる前にデータが取り除かれているからです。
    httpClient.addResponseModifier<CasesModel>((request, response) {
      CasesModel model = response.body;
      if (model.countries.contains('Brazil')) {
        model.countries.remove('Brazilll');
      }
    });

    httpClient.addAuthenticator((request) async {
      final response = await get("http://yourapi/token");
      final token = response.body['token'];
      // ヘッダーをセット
      request.headers['Authorization'] = "$token";
      return request;
    });

    // HttpStatus が HttpStatus.unauthorized である限り、
    // 3回まで認証が試みられます。
    httpClient.maxAuthRetries = 3;
  }
  }

  @override
  Future<Response<CasesModel>> getCases(String path) => get(path);
}
GetPageのミドルウェア
GetPageに新しいプロパティが追加され、GetMiddleWareのListを設定することができるようになりました。GetMiddleWareは設定した任意の順序で実行されます。
注: GetPageにMiddlewareを設定すると、そのページの下にあるchildはすべて同じMiddlewareを自動的に持つことになります。
実行順
GetMiddlewareに設定したpriority(優先度)の若い順にミドルウェアが実行されます。
final middlewares = [
  GetMiddleware(priority: 2),
  GetMiddleware(priority: 5),
  GetMiddleware(priority: 4),
  GetMiddleware(priority: -8),
];
この場合の実行順序は -8 => 2 => 4 => 5
redirect
redirect関数は、Routeを呼び出してページが検索されると実行されます。リダイレクト先のRouteSettingsが戻り値となります。もしくはnullを与えれば、リダイレクトは行われません。
RouteSettings redirect(String route) {
  final authService = Get.find<AuthService>();
  return authService.authed.value ? null : RouteSettings(name: '/login')
}
onPageCalled
onPageCalled関数は、ページが呼び出された直後に実行されます。 この関数を使ってページの内容を変更したり、新しいページを作成したりすることができます。
GetPage onPageCalled(GetPage page) {
  final authService = Get.find<AuthService>();
  return page.copyWith(title: 'Welcome ${authService.UserName}');
}
onBindingsStart
onBindingsStart関数は、Bindingsが初期化される直前に実行されます。 たとえば、ページのBindingsを変更することもできます。
List<Bindings> onBindingsStart(List<Bindings> bindings) {
  final authService = Get.find<AuthService>();
  if (authService.isAdmin) {
    bindings.add(AdminBinding());
  }
  return bindings;
}
onPageBuildStart
onPageBuildStart関数は、Bindingsが初期化された直後、ページWidetが作成される前に実行されます。
GetPageBuilder onPageBuildStart(GetPageBuilder page) {
  print('bindings are ready');
  return page;
}
onPageBuilt
onPageBuilt関数は、GetPage.page(ページのビルダー)が呼び出された直後に実行され、表示されるWidgetを結果として受け取ることができます。
onPageDispose
onPageDispose関数は、ページに関するすべてのオブジェクト(Controller、Viewなど)が破棄された直後に実行されます。
その他API
// 現在の画面に渡されているargs(引数)を取得
Get.arguments

// 直前のRouteの名前("/" など)を取得
Get.previousRoute

// 現在のRouteオブジェクトを取得
Get.rawRoute

// GetObserverからRoutingを取得
Get.routing

// SnackBarが開いているかチェック
Get.isSnackbarOpen

// Dialogが開いているかチェック
Get.isDialogOpen

// BottomSheetが開いているかチェック
Get.isBottomSheetOpen

// Routeを削除
Get.removeRoute()

// 引数のRoutePredicateがtrueを返すまで画面を戻る
Get.until()

// 引数で指定したRouteに進み、RoutePredicateがtrueを返すまで画面を戻る
Get.offUntil()

// 引数で指定した名前付きRouteに進み、RoutePredicateがtrueを返すまで画面を戻る
Get.offNamedUntil()

// アプリがどのプラットフォームで実行されているかのチェック
GetPlatform.isAndroid
GetPlatform.isIOS
GetPlatform.isMacOS
GetPlatform.isWindows
GetPlatform.isLinux
GetPlatform.isFuchsia

// アプリがどのデバイスで実行されているかのチェック
GetPlatform.isMobile
GetPlatform.isDesktop
// プラットフォームとデバイスのチェックは独立
// 同じOSでもウェブで実行されているのか、ネイティブで実行されているのか区別
GetPlatform.isWeb


// MediaQuery.of(context).size.height と同じ
// ただしimmutable
Get.height
Get.width

// Navigatorの現在のcontextを取得
Get.context

// SnackBar/Dialog/BottomSheet などフォアグラウンドのcontextを取得
Get.overlayContext

// 注: 以降のメソッドはcontextの拡張メソッドです。
// contextと同じくUIのどこからでもアクセスできます。

// ウィンドウサイズの変更などに合わせて変わる height/width を取得
context.width
context.height

// 画面の半分のサイズ,1/3のサイズなどを取得
// レスポンシブなデザインの場合に便利
// オプションのパラメーター dividedBy で割る数を指定
// オプションのパラメーター reducedBy でパーセンテージを指定
context.heightTransformer()
context.widthTransformer()

/// MediaQuery.of(context).size とほぼ同じ
context.mediaQuerySize()

/// MediaQuery.of(context).padding とほぼ同じ
context.mediaQueryPadding()

/// MediaQuery.of(context).viewPadding とほぼ同じ
context.mediaQueryViewPadding()

/// MediaQuery.of(context).viewInsets とほぼ同じ
context.mediaQueryViewInsets()

/// MediaQuery.of(context).orientation とほぼ同じ
context.orientation()

/// デバイスがランドスケープ(横長)モードかどうかチェック
context.isLandscape()

/// デバイスがポートレート(縦長)モードかどうかチェック
context.isPortrait()

/// MediaQuery.of(context).devicePixelRatio とほぼ同じ
context.devicePixelRatio()

/// MediaQuery.of(context).textScaleFactor とほぼ同じ
context.textScaleFactor()

/// 画面の短辺の長さを取得
context.mediaQueryShortestSide()

/// 画面の横幅が800より大きい場合にtrueを返す
context.showNavbar()

/// 画面の短辺が600より小さい場合にtrueを返す
context.isPhone()

/// 画面の短辺が600より小さい場合にtrueを返す
context.isSmallTablet()

/// 画面の短辺が720より大きい場合にtrueを返す
context.isLargeTablet()

/// デバイスがタブレットの場合にtrueを返す
context.isTablet()

/// 画面サイズに合わせて value<T> を返す
/// たとえば:
/// 短辺が300より小さい → watchパラメーターの値を返す
/// 短辺が600より小さい → mobileパラメーターの値を返す
/// 短辺が1200より小さい → tabletパラメーターの値を返す
/// 横幅が1200より大きい → desktopパラメーターの値を返す
context.responsiveValue<T>()
オプションのグローバル設定と手動設定
GetMaterialApp はすべてあなたの代わりに設定してくれますが、手動で設定を施したい場合は MaterialApp の navigatorKey と navigatorObservers の値を指定してください。
MaterialApp(
  navigatorKey: Get.key,
  navigatorObservers: [GetObserver()],
);GetObserver内で独自のミドルウェアを使用することもできます。これは他に影響を及ぼすことはありません。
MaterialApp(
  navigatorKey: Get.key,
  navigatorObservers: [
    GetObserver(MiddleWare.observer) // ここ
  ],
);
Get クラスにグローバル設定を施すことができます。Routeをプッシュする前のコードに Get.config を追加するだけです。もしくは、GetMaterialApp 内で直接設定することもできます。
GetMaterialApp(
  enableLog: true,
  defaultTransition: Transition.fade,
  opaqueRoute: Get.isOpaqueRouteDefault,
  popGesture: Get.isPopGestureEnable,
  transitionDuration: Get.defaultDurationTransition,
  defaultGlobalState: Get.defaultGlobalState,
);

Get.config(
  enableLog = true,
  defaultPopGesture = true,
  defaultTransition = Transitions.cupertino
)
オプションで、すべてのログメッセージを Get からリダイレクトさせることができます。
好きなロギングのパッケージを使ってログを取得したい場合はこのようにしてください。
GetMaterialApp(
  enableLog: true,
  logWriterCallback: localLogWriter,
);

void localLogWriter(String text, {bool isError = false}) {
  // ここでお好みのロギングパッケージにメッセージを渡してください
  // enableLog: false にしても、ログメッセージはこのコールバックでプッシュされる点ご注意を
  // ログが有効かどうかのチェックは Get.isLogEnable で可能
}
ローカルステートWidget
These Widgets allows you to manage a single value, and keep the state ephemeral and locally.
We have flavours for Reactive and Simple.
For instance, you might use them to toggle obscureText in a TextField, maybe create a custom
Expandable Panel, or maybe modify the current index in BottomNavigationBar while changing the content
of the body in a Scaffold.
ValueBuilder
A simplification of StatefulWidget that works with a .setState callback that takes the updated value.
ValueBuilder<bool>(
  initialValue: false,
  builder: (value, updateFn) => Switch(
    value: value,
    onChanged: updateFn, // same signature! you could use ( newValue ) => updateFn( newValue )
  ),
  // if you need to call something outside the builder method.
  onUpdate: (value) => print("Value updated: $value"),
  onDispose: () => print("Widget unmounted"),
),
ObxValue
Similar to ValueBuilder, but this is the Reactive version, you pass a Rx instance (remember the magical .obs?) and
updates automatically... isn't it awesome?
ObxValue((data) => Switch(
        value: data.value,
        onChanged: data, // Rx has a _callable_ function! You could use (flag) => data.value = flag,
    ),
    false.obs,
),
Useful tips
.observables (also known as Rx Types) have a wide variety of internal methods and operators.
Is very common to believe that a property with
.obsIS the actual value... but make no mistake! We avoid the Type declaration of the variable, because Dart's compiler is smart enough, and the code looks cleaner, but:
var message = 'Hello world'.obs;
print( 'Message "$message" has Type ${message.runtimeType}');
Even if message prints the actual String value, the Type is RxString!
So, you can't do message.substring( 0, 4 ).
You have to access the real value inside the observable:
The most "used way" is .value, but, did you know that you can also use...
final name = 'GetX'.obs;
// only "updates" the stream, if the value is different from the current one.
name.value = 'Hey';

// All Rx properties are "callable" and returns the new value.
// but this approach does not accepts `null`, the UI will not rebuild.
name('Hello');

// is like a getter, prints 'Hello'.
name() ;

/// numbers:

final count = 0.obs;

// You can use all non mutable operations from num primitives!
count + 1;

// Watch out! this is only valid if `count` is not final, but var
count += 1;

// You can also compare against values:
count > 2;

/// booleans:

final flag = false.obs;

// switches the value between true/false
flag.toggle();


/// all types:

// Sets the `value` to null.
flag.nil();

// All toString(), toJson() operations are passed down to the `value`
print( count ); // calls `toString()` inside  for RxInt

final abc = [0,1,2].obs;
// Converts the value to a json Array, prints RxList
// Json is supported by all Rx types!
print('json: ${jsonEncode(abc)}, type: ${abc.runtimeType}');

// RxMap, RxList and RxSet are special Rx types, that extends their native types.
// but you can work with a List as a regular list, although is reactive!
abc.add(12); // pushes 12 to the list, and UPDATES the stream.
abc[3]; // like Lists, reads the index 3.


// equality works with the Rx and the value, but hashCode is always taken from the value
final number = 12.obs;
print( number == 12 ); // prints > true

/// Custom Rx Models:

// toJson(), toString() are deferred to the child, so you can implement override on them, and print() the observable directly.

class User {
    String name, last;
    int age;
    User({this.name, this.last, this.age});

    @override
    String toString() => '$name $last, $age years old';
}

final user = User(name: 'John', last: 'Doe', age: 33).obs;

// `user` is "reactive", but the properties inside ARE NOT!
// So, if we change some variable inside of it...
user.value.name = 'Roi';
// The widget will not rebuild!,
// `Rx` don't have any clue when you change something inside user.
// So, for custom classes, we need to manually "notify" the change.
user.refresh();

// or we can use the `update()` method!
user.update((value){
  value.name='Roi';
});

print( user );
StateMixin
Another way to handle your UI state is use the StateMixin<T> .
To implement it, use the with to add the StateMixin<T>
to your controller which allows a T model.
class Controller extends GetController with StateMixin<User>{}The change() method change the State whenever we want.
Just pass the data and the status in this way:
change(data, status: RxStatus.success());RxStatus allow these status:
RxStatus.loading();
RxStatus.success();
RxStatus.empty();
RxStatus.error('message');
To represent it in the UI, use:
class OtherClass extends GetView<Controller> {
  @override
  Widget build(BuildContext context) {
    return Scaffold(

      body: controller.obx(
        (state)=>Text(state.name),

        // here you can put your custom loading indicator, but
        // by default would be Center(child:CircularProgressIndicator())
        onLoading: CustomLoadingIndicator(),
        onEmpty: Text('No data found'),

        // here also you can set your own error widget, but by
        // default will be an Center(child:Text(error))
        onError: (error)=>Text(error),
      ),
    );
}
GetView
I love this Widget, is so simple, yet, so useful!
Is a const Stateless Widget that has a getter controller for a registered Controller, that's all.
 class AwesomeController extends GetController {
   final String title = 'My Awesome View';
 }

  // ALWAYS remember to pass the `Type` you used to register your controller!
 class AwesomeView extends GetView<AwesomeController> {
   @override
   Widget build(BuildContext context) {
     return Container(
       padding: EdgeInsets.all(20),
       child: Text(controller.title), // just call `controller.something`
     );
   }
 }
GetResponsiveView
Extend this widget to build responsive view.
this widget contains the screen property that have all
information about the screen size and type.
How to use it
You have two options to build it.
- with
buildermethod you return the widget to build. - with methods
desktop,tablet,phone,watch. the specific method will be built when the screen type matches the method when the screen is [ScreenType.Tablet] thetabletmethod will be exuded and so on. Note: If you use this method please set the propertyalwaysUseBuildertofalse
With settings property you can set the width limit for the screen types.
 Code to this screen
code
Code to this screen
code
GetWidget
Most people have no idea about this Widget, or totally confuse the usage of it.
The use case is very rare, but very specific: It caches a Controller.
Because of the cache, can't be a const Stateless.
So, when do you need to "cache" a Controller?
If you use, another "not so common" feature of GetX: Get.create().
Get.create(()=>Controller()) will generate a new Controller each time you call
Get.find<Controller>(),
That's where GetWidget shines... as you can use it, for example,
to keep a list of Todo items. So, if the widget gets "rebuilt", it will keep the same controller instance.
GetxService
This class is like a GetxController, it shares the same lifecycle ( onInit(), onReady(), onClose()).
But has no "logic" inside of it. It just notifies GetX Dependency Injection system, that this subclass
can not be removed from memory.
So is super useful to keep your "Services" always reachable and active with Get.find(). Like:
ApiService, StorageService, CacheService.
Future<void> main() async {
  await initServices(); /// AWAIT SERVICES INITIALIZATION.
  runApp(SomeApp());
}

/// Is a smart move to make your Services intiialize before you run the Flutter app.
/// as you can control the execution flow (maybe you need to load some Theme configuration,
/// apiKey, language defined by the User... so load SettingService before running ApiService.
/// so GetMaterialApp() doesnt have to rebuild, and takes the values directly.
void initServices() async {
  print('starting services ...');
  /// Here is where you put get_storage, hive, shared_pref initialization.
  /// or moor connection, or whatever that's async.
  await Get.putAsync(() => DbService().init());
  await Get.putAsync(SettingsService()).init();
  print('All services started...');
}

class DbService extends GetxService {
  Future<DbService> init() async {
    print('$runtimeType delays 2 sec');
    await 2.delay();
    print('$runtimeType ready!');
    return this;
  }
}

class SettingsService extends GetxService {
  void init() async {
    print('$runtimeType delays 1 sec');
    await 1.delay();
    print('$runtimeType ready!');
  }
}
The only way to actually delete a GetxService, is with Get.reset() which is like a
"Hot Reboot" of your app. So remember, if you need absolute persistence of a class instance during the
lifetime of your app, use GetxService.
Tests
You can test your controllers like any other class, including their lifecycles:
class Controller extends GetxController {
  @override
  void onInit() {
    super.onInit();
    //Change value to name2
    name.value = 'name2';
  }

  @override
  void onClose() {
    name.value = '';
    super.onClose();
  }

  final name = 'name1'.obs;

  void changeName() => name.value = 'name3';
}

void main() {
  test('''
Test the state of the reactive variable "name" across all of its lifecycles''',
      () {
    /// You can test the controller without the lifecycle,
    /// but it's not recommended unless you're not using
    ///  GetX dependency injection
    final controller = Controller();
    expect(controller.name.value, 'name1');

    /// If you are using it, you can test everything,
    /// including the state of the application after each lifecycle.
    Get.put(controller); // onInit was called
    expect(controller.name.value, 'name2');

    /// Test your functions
    controller.changeName();
    expect(controller.name.value, 'name3');

    /// onClose was called
    Get.delete<Controller>();

    expect(controller.name.value, '');
  });
}
Tips
Mockito or mocktail
If you need to mock your GetxController/GetxService, you should extend GetxController, and mixin it with Mock, that way
class NotificationServiceMock extends GetxService with Mock implements NotificationService {}Using Get.reset()
If you are testing widgets, or test groups, use Get.reset at the end of your test or in tearDown to reset all settings from your previous test.
Get.testMode
if you are using your navigation in your controllers, use Get.testMode = true at the beginning of your main.
Breaking changes from 2.0
1- Rx types:
| Before | After |
|---|---|
| StringX | RxString |
| IntX | RxInt |
| MapX | RxMap |
| ListX | RxList |
| NumX | RxNum |
| DoubleX | RxDouble |
RxController and GetBuilder now have merged, you no longer need to memorize which controller you want to use, just use GetxController, it will work for simple state management and for reactive as well.
2- NamedRoutes Before:
GetMaterialApp(
  namedRoutes: {
    '/': GetRoute(page: Home()),
  }
)
Now:
GetMaterialApp(
  getPages: [
    GetPage(name: '/', page: () => Home()),
  ]
)
Why this change? Often, it may be necessary to decide which page will be displayed from a parameter, or a login token, the previous approach was inflexible, as it did not allow this. Inserting the page into a function has significantly reduced the RAM consumption, since the routes will not be allocated in memory since the app was started, and it also allowed to do this type of approach:
GetStorage box = GetStorage();

GetMaterialApp(
  getPages: [
    GetPage(name: '/', page:(){
      return box.hasData('token') ? Home() : Login();
    })
  ]
)
なぜGetXなのか
1- Flutterのアップデートが重なると、せっかく作ったパッケージがうまく動かなくなることがあります。コンパイルエラーを起こしたり、その時点で解決方法がないエラーが発生したり。開発者はそのエラーがどこから来たのか把握するために問題の追跡をし、該当リポジトリにissueを提起し、問題が解決されるのを見届ける必要があります。Getは開発に必要な主要リソース(状態管理、依存オブジェクトの管理、Route管理)を一元化し、Pubspecにパッケージを1つ追加するだけでコーディングを開始することができます。Flutterのアップデート後に必要なことは、Getも併せてアップデートすることだけです。それですぐに作業を再開できます。またGetはパッケージ間の互換性の問題も解消します。互いに依存するパッケージAの最新バージョンとBの最新バージョンの間に互換性がない、ということが何度あったでしょうか。Getを使えばすべてが同じパッケージ内にあるため、互換性の心配はありません。
2- Flutterは手軽で素晴らしいフレームワークですが、Navigator.of(context).push (context, builder [...]のように、ほとんどの開発者にとって不要な定型文がまだ残っています。Getを使えばそのような定型文を簡素化できます。Routeを呼ぶためだけに8行のコードを書く代わりに、Get.to(Home())を実行すれば、次のページに行くことができるのです。またウェブURLを動的なものにするのは現在Flutterでは本当に骨の折れる作業ですが、GetXを使えば非常に簡単です。そしてFlutterにおける状態管理と依存オブジェクトの管理については、たくさんのパターンやパッケージがあるので多くの議論を生んでいます。しかしGetXのアプローチは大変簡単です。変数の最後に「.obs」を追加し、Obxクラスの中にWidgetを配置するだけで、その変数のすべての更新が自動的に画面に反映されます。
3- パフォーマンスのことを気にせず開発できます。Flutterのパフォーマンスはそれだけで素晴らしいものですが、アプリ内で状態管理と併せて、BLoC/store/controllerなどのクラスを配布するサービスロケーターを使用することを想像してみてください。そのインスタンスが必要ないときはリソースを解放するメソッドを明示的に呼び出さなければなりません。しかし、使用されなくなったら単純に自動でメモリから削除してくれればいいのに、と考えたことはありませんか?それを実現してくれるのがGetXです。SmartManagement機能により未使用リソースはすべてメモリから削除されるので、本来のプログラミングに集中することができます。メモリ管理のためのロジックを作らなくても、常に必要最小限のリソースを使っていることが保証されるのです。
4- コードのデカップリング(分離)がしやすい。「Viewをビジネスロジックから分離する」というコンセプトを聞いたことがあるかもしれません。これはなにもBLoC、MVC、MVVMに限ったことではなく、どのアーキテクチャパターンにもこのコンセプトが底流にあると言っていいでしょう。しかし、Flutterではcontextの使用によりこのコンセプトが弱まってしまうことがあります。 InheritedWidgetを参照するためにcontextが必要なとき、viewの中でそれを使用するか、パラメータとしてcontextを渡しますよね?私はこの方法は美しくないと感じます。特にチームで仕事をする場合において、常にView内のビジネスロジックに依存しなければならないなんて。GetXのアプローチは標準的なそれとは異質のもので、StatefulWidgetやinitStateなどの使用を禁止しているわけではありませんが、それよりもっとすっきり書ける類似のアプローチを備えています。controller自身にライフサイクルがあるため、たとえばREST APIのリクエストを行うときも、Viewの中の何かに依存するということがありません。controllerのライフサイクルの一つである onInit を使用してhttpを呼び出し、データが到着すると変数にセットされます。GetXはフルリアクティブなので(Streamが根底にあります)、インスタンス変数が値で埋まれば、その変数を使用するすべてのWidgetが自動的に更新されます。これにより、UIの専門家はWidgetの構築に注力することができ、ボタンクリックなどのユーザーイベント以外のものをビジネスロジックに渡す必要がなくなります。その一方で、ビジネスロジックを扱う人はビジネスロジックだけに集中して、個別テストを簡単に行うことができます。
このGetXライブラリは今後も更新され続け、新しい機能を実装していきます。気軽にプルリクエストを出していただき、ライブラリの成長に貢献していただければ幸いです。
コミュニティ
コミュニティチャンネル
GetXコミュニティは非常に活発で有益な情報であふれています。ご質問がある場合や、このフレームワークの使用に関して支援が必要な場合は、ぜひコミュニティチャンネルにご参加ください。このリポジトリは、issueの提起およびリクエスト専用ですが、気軽にコミュニティにご参加いただければ幸いです。
| Slack | Discord | Telegram |
|---|---|---|
|
貢献方法
GetXプロジェクトに貢献してみませんか?あなたをコントリビューターの一人としてご紹介できるのを楽しみにしています。GetおよびFlutterをより良いものにするためのコントリビュート例をご紹介します。
- Readmeの多言語対応。
- Readmeの追加ドキュメント執筆 (ドキュメントで触れられていない機能がまだまだたくさんあります)。
- Getの使い方を紹介する記事やビデオの作成(Readmeに掲載させていただきます。将来的にWikiができればそこにも掲載予定)。
- コードやテストのプルリクエスト。
- 新機能の提案。
どのような形の貢献であれ歓迎しますので、ぜひコミュニティにご参加ください!
GetXに関する記事とビデオ
- Flutter Getx EcoSystem package for arabic people - Tutorial by Pesa Coder.
- Dynamic Themes in 3 lines using GetX™ - Tutorial by Rod Brown.
- Complete GetX™ Navigation - Route management video by Amateur Coder.
- Complete GetX State Management - State management video by Amateur Coder.
- GetX™ Other Features - Utils, storage, bindings and other features video by Amateur Coder.
- Firestore User with GetX | Todo App - Video by Amateur Coder.
- Firebase Auth with GetX | Todo App - Video by Amateur Coder.
- The Flutter GetX™ Ecosystem ~ State Management - State management by Aachman Garg.
- The Flutter GetX™ Ecosystem ~ Dependency Injection - Dependency Injection by Aachman Garg.
- GetX, the all-in-one Flutter package - A brief tutorial covering State Management and Navigation by Thad Carnevalli.
- Build a To-do List App from scratch using Flutter and GetX - UI + State Management + Storage video by Thad Carnevalli.
- GetX Flutter Firebase Auth Example - Article by Jeff McMorris.
- Flutter State Management with GetX – Complete App - by App With Flutter.
- Flutter Routing with Animation using Get Package - by App With Flutter.
- A minimal example on dartpad - by Roi Peker